6' x 4' Wooden Sider Trailer
Deck & Cladding
Note - If you are using 1200mm wide plywood sheets, fit the side cladding first. See below for more details.
DECKING
Plywood decking is a versatile and hard wearing decking material. It is relatively cheap and easy to replace if it gets damaged. Plywood normally has two graded faces, with one face being better than the other. For other decking options, see the "Trailer Decking" page.
For trailer purposes a "CD" grade of plywood is more than suitable. It does pay to handpick your plywood from the merchant if possible, as there may be a few imperfections that pass the "C" grade but would look un-slightly on your trailer.
Before positioning your plywood on the trailer, mark with pencil or chalk, the positions of your cross member centres along the outside face of the chassis rails.
Cut the timber/plywood to length allowing a little clearance at either end to allow for expansion when the deck gets wet.
With a string line or a straight edge, mark the sheet across the width from the marks on the side panels.
Mark out evenly across the lines spacing the hole centres at approximately 200mm apart both along the cross 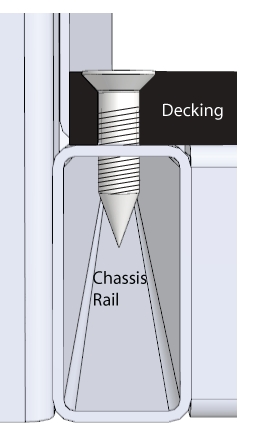
Fastenings
There are a couple of options for fastening your deck to your chassis. Rivets have been used for many years, but after a couple of years of carting loads around, rivets tend to fail and pop out. By far the best option is self tapping countersunk screws and if you have a good grunty electric hand drill, this job will not take long. For a 17 to 19mm deck thickness, 8G x 25mm screws are ideal. A 3.5mm hole needs to be predrilled and then the screws can be driven in by either hand or with the electric drill and screw attachment.
It pays to start at one end of the trailer and work your way down to the other end to prevent any buckling of the deck.
As with all timber, the plywood deck will swell and shrink depending on how wet or dry the environment is, and you may find over time, the occasional screw breaking from this action on the deck. If this does happen, increase the size of the replacement screw to a 10G x 25mm.
Once the deck is screwed down, give the deck a good going over with an orbital sander to take off any high spots.
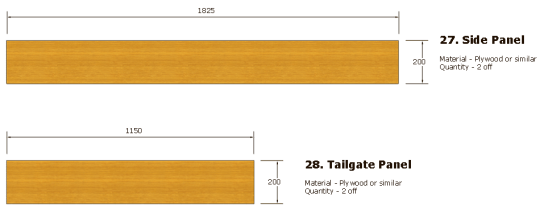
SIDE & TAILGATE CLADDING
Cut the side panels to fit between the end uprights, again allowing a little clearance (2-3mm) to allow for expansion.
If you are using 1200mm wide sheets for the decking, add the thickness of the decking to the depth of the sides to ensure a full 200mm deep side.
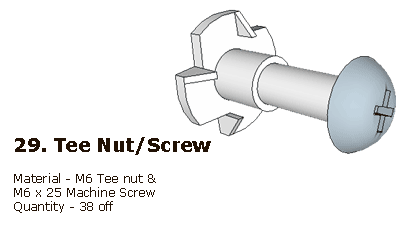
Clamp the sides & tailgates in position and drill through the uprights and hinge plates to suit your fastenings. The ideal fastening method is to use machine screws and "Tee" nuts as shown below.
Once the deck is fitted, attach the sides and tailgate cladding - Stain or paint prior to fitting if desired.